

Hey guys, In this post we are going to learn about How to get upload/delete and preview the files attachments through apex class uses of lightning:fileCard and lightning:fileUpload elements in Salesforce Lightning component
Attach Files to Records
Attach files to records for a powerful way to collaborate and stay organized in Salesforce. Keep information on an opportunity, account, case or sObject (Custom Object) right where you need it. Share relevant documents with anyone with access to the record. To know more details about Attach Files to Records, click Here.
Requirement:- Upload the custom file on lightning component such like (jpg’, ‘jpeg’,’pdf’, ‘doc’) etc.. then iterate the list of attachment record and get preview (zoom), delete file dynamically.


Files we used to Preview & Delete aura component in this post example
| UploadFileCmp.cmp | Lightning Component | It is used for create the table of Preview & Delete attachment file in aura component. |
| UploadFileCmpController.js | JavaScript Controller File | It is used for communicate to server side apex method and fetch list of file and attachment from salesforce object. |
| UploadFileCmpHelper.js | JavaScript Helper File | It is hold for Javascript Helper Function to get file & attachment from apex method. |
| UploadFileCmp.css | Style CSS | It is used to create a content box border color and alignment. |
| uploadFileHandler.apxc | Apex Class Controller | It is used for fetch the attachment files from sObject in Salesforce. |
|
Standard Object:- ContentDocument |
Object and their fields:- LinkedEntityId, ContentDocumentId, Title, FileType | |
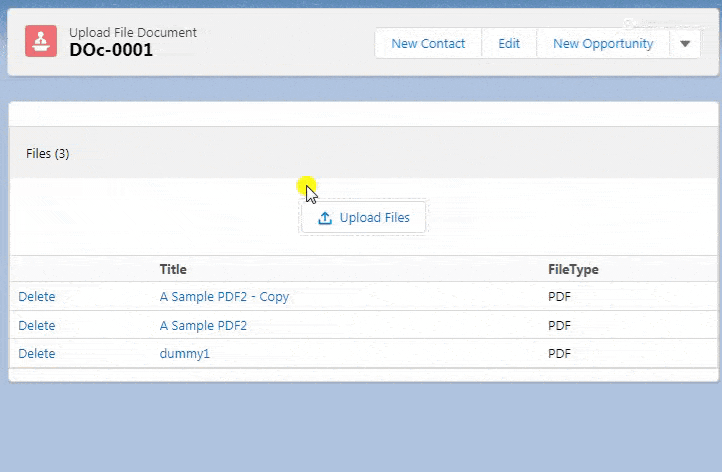
Final Output
You can download file directly from github by Click Here.
Other related post that would you like to learn in Salesforce
- Find the below steps
Create Lightning Component
Step 1:- Create Lightning Component : UploadFileCmp.cmp
From Developer Console >> File >> New >> Lightning Component

UploadFileCmp.cmp [Lightning Component File]
<aura:component controller="uploadFileHandler" implements="force:appHostable,flexipage:availableForAllPageTypes,flexipage:availableForRecordHome,force:hasRecordId,forceCommunity:availableForAllPageTypes,force:lightningQuickAction" access="global" ><aura:handler name="init" value="{!this}" action="{!c.doInit}"/><aura:attribute name="files" type="ContentDocument[]"/><aura:attribute name="recordId" type="string" default=""/><aura:attribute name="accept" type="List" default="['.jpg', '.jpeg','.pdf','.csv','.xlsx']"/><aura:attribute name="multiple" type="Boolean" default="true"/><aura:attribute name="Spinner" type="boolean" default="false"/><lightning:card><div class="slds"><lightning:notificationsLibrary aura:id="notifLib"/><div class="contentbox"><div class="slds-page-header header">Files ({!v.files.length})</div>
<div class="slds-grid"><div style="width:100%"><center><lightning:fileUpload label="" multiple="{!v.multiple}"accept="{!v.accept}" recordId="{!v.recordId}"onuploadfinished="{!c.UploadFinished}" /></center></div></div><br/><div class="slds-form--compound" style="position:relative"><table class="slds-table slds-table--bordered"><thead><tr><th></th><th>Title</th>
<th>FileType</th>
</tr></thead><tbody><aura:iteration items="{!v.files}" var="f"><tr><td><a href="javascript:void(0)" id="{!f.Id}" onclick="{!c.delFilesAction}">Delete</a></td>
<td><a href="" id="{!f.Id}" onclick="{!c.previewFileAction}">{!f.Title}</a></td>
<td>{!f.FileType}</td>
</tr></aura:iteration></tbody></table><aura:if isTrue="{!v.Spinner}"><div class="slds-spinner_container"><div class="slds-spinner slds-spinner--medium" aria-hidden="false" role="alert"><div class="slds-spinner__dot-a"></div><div class="slds-spinner__dot-b"></div></div></div></aura:if></div></div><br/><br/><!--Start RelatedTopics Section--><div style="border:1px #ddd solid; padding:10px; background:#eee; margin:40px 0;"><p data-aura-rendered-by="435:0"><img src="https://www.w3web.net/wp-content/uploads/2021/05/thumbsUpLike.png" width="25" height="25" style="vertical-align:top; margin-right:10px;" data-aura-rendered-by="436:0"><strong data-aura-rendered-by="437:0"><span style="font-size:16px; font-style:italic; display:inline-block; margin-right:5px;">Don't forget to check out:-</span><a href="https://www.w3web.net/" target="_blank" rel="noopener noreferrer" style="text-decoration:none;" data-aura-rendered-by="440:0">An easy way to learn step-by-step online free Salesforce tutorial, To know more Click <span style="color:#ff8000; font-size:18px;" data-aura-rendered-by="442:0">Here..</span></a></strong></p>
<br/><br/><p data-aura-rendered-by="435:0"><img src="https://www.w3web.net/wp-content/uploads/2021/07/tickMarkIcon.png" width="25" height="25" style="vertical-align:top; margin-right:10px;" data-aura-rendered-by="436:0"><strong data-aura-rendered-by="437:0"><span style="font-size:17px; font-style:italic; display:inline-block; margin-right:5px; color:rgb(255 128 0);">You May Also Like →</span> </strong></p>
<div style="display:block; overflow:hidden;"><div style="width: 50%; float:left; display:inline-block"><ul style="list-style-type: square; font-size: 16px; margin: 0 0 0 54px; padding: 0;"><li><a href="https://www.w3web.net/lwc-get-set-lightning-checkbox-value/" target="_blank" rel="noopener noreferrer">How to get selected checkbox value in lwc</a></li>
<li><a href="https://www.w3web.net/display-account-related-contacts-in-lwc/" target="_blank" rel="noopener noreferrer">how to display account related contacts based on AccountId in lwc</a></li>
<li><a href="https://www.w3web.net/create-lightning-datatable-row-actions-in-lwc/" target="_blank" rel="noopener noreferrer">how to create lightning datatable row actions in lwc</a></li>
<li><a href="https://www.w3web.net/if-and-else-condition-in-lwc/" target="_blank" rel="noopener noreferrer">how to use if and else condition in lwc</a></li>
<li><a href="https://www.w3web.net/get-selected-radio-button-value-and-checked-default-in-lwc/" target="_blank" rel="noopener noreferrer">how to display selected radio button value in lwc</a></li>
</ul></div><div style="width: 50%; float:left; display:inline-block"><ul style="list-style-type: square; font-size: 16px; margin: 0 0 0 54px; padding: 0;"><li><a href="https://www.w3web.net/display-account-related-contacts-lwc/" target="_blank" rel="noopener noreferrer">display account related contacts based on account name in lwc</a></li>
<li><a href="https://www.w3web.net/create-lightning-datatable-row-actions-in-lwc/" target="_blank" rel="noopener noreferrer">how to insert a record of account Using apex class in LWC</a></li>
<li><a href="https://www.w3web.net/fetch-picklist-values-dynamic-in-lwc/" target="_blank" rel="noopener noreferrer">how to get picklist values dynamically in lwc</a></li>
<li><a href="https://www.w3web.net/edit-save-and-remove-rows-dynamically-in-lightning-component/" target="_blank" rel="noopener noreferrer">how to edit/save row dynamically in lightning component</a></li>
<li><a href="https://www.w3web.net/update-parent-object-from-child/" target="_blank" rel="noopener noreferrer">update parent field from child using apex trigger</a></li>
</ul></div><div style="clear:both;"></div><br/><div class="youtubeIcon"><a href="https://www.youtube.com/channel/UCW62gTen2zniILj9xE6LmOg" target="_blank" rel="noopener noreferrer"><img src="https://www.w3web.net/wp-content/uploads/2021/11/youtubeIcon.png" width="25" height="25" style="vertical-align:top; margin-right:10px;"/> <strong>TechW3web:-</strong> To know more, Use this <span style="color: #ff8000; font-weight: bold;">Link</span> </a>
</div></div></div><!--End RelatedTopics Section--></div></lightning:card></aura:component>
Create JavaScript Controller
Step 2:- Create Lightning Component : UploadFileCmpController.js
From Developer Console >> File >> New >> Lightning Component >> JavaScript Controller
UploadFileCmpController.js [JavaScript Controller]
({
doInit:function(component,event,helper){
helper.getuploadedFiles(component);
},
previewFileAction :function(component,event,helper){
var rec_id = event.currentTarget.id;
$A.get('e.lightning:openFiles').fire({
recordIds: [rec_id]
});
},
UploadFinished : function(component, event, helper) {
var uploadedFiles = event.getParam("files");
//var documentId = uploadedFiles[0].documentId;//var fileName = uploadedFiles[0].name;helper.getuploadedFiles(component);
component.find('notifLib').showNotice({
"variant": "success",
"header": "Success",
"message": "File Uploaded successfully!!",
closeCallback: function() {}
});
},
delFilesAction:function(component,event,helper){
component.set("v.Spinner", true);
var documentId = event.currentTarget.id;
helper.delUploadedfiles(component,documentId);
}})
Create JavaScript Helper
Step 3:- Create Lightning Component : UploadFileCmpHelper.js
From Developer Console >> File >> New >> Lightning Component >> JavaScript Helper
UploadFileCmpHelper.js [JavaScript Helper File]
({
getuploadedFiles:function(component){
var action = component.get("c.getFiles");
action.setParams({
"recordId":component.get("v.recordId")
});
action.setCallback(this,function(response){
var state = response.getState();
if(state=='SUCCESS'){
var result = response.getReturnValue();
component.set("v.files",result);
}});
$A.enqueueAction(action);
},
delUploadedfiles : function(component,documentId) {
var action = component.get("c.deleteFiles");
action.setParams({
"sdocumentId":documentId
});
action.setCallback(this,function(response){
var state = response.getState();
if(state=='SUCCESS'){
this.getuploadedFiles(component);
component.set("v.Spinner", false);
}});
$A.enqueueAction(action);
},
})
Step 4:- Create Lightning Component Style: UploadFileCmp.css
From Developer Console >> File >> New >> Lightning Component >> Component Style CSS
UploadFileCmp.css [Style CSS]
.THIS .contentbox{
border-left: 1px solid #dddddd;
border-right: 1px solid #dddddd;
border-bottom: 1px solid #dddddd;
border-top: 1px solid #dddddd;
}.THIS .header{
border-radius: 0px;
border-right: 0px;
border-left: 0px;
border-top: 0px;
box-shadow: 0 0px 0px 0 rgba(0, 0, 0, 0.1);
}
Create Apex Class Controller
Step 5:- Create Apex Class : uploadFileHandler.apxc
From Developer Console >> File >> New >> Apex Class
uploadFileHandler.apxc [Apex Class Controller]
public class uploadFileHandler {@AuraEnabled
public static List<ContentDocument> getFiles(string recordId){
Set<Id> recordIds=NEW Set<Id>{recordId};
Set<Id> documentIds = NEW Set<Id>();
List<ContentDocumentLink> cdl=[SELECT id,LinkedEntityId,ContentDocumentId FROM ContentDocumentLink WHERE LinkedEntityId IN:recordIds];
FOR(ContentDocumentLink cdLink:cdl){
documentIds.add(cdLink.ContentDocumentId);
}RETURN [SELECT Id,Title,FileType FROM ContentDocument WHERE id IN: documentIds];
}@AuraEnabled
public static void deleteFiles(string sdocumentId){
DELETE [SELECT Id,Title,FileType FROM ContentDocument WHERE id=:sdocumentId];
}}

Further post that would you like to learn in Salesforce
What is the difference between file and attachment in Salesforce?
Files need to upload, store, share, and collaborate on Salesforce files in the cloud. Attach files to records from the Attachments related list on selected detail pages. We can upload a file and store it privately until you're ready to share it.
Where are Salesforce attachments?
Attachments appear in the Notes & Attachments Related List. Salesforce Files use ContentVersion records which are then associated with a parent record.
How do I convert attachments in Salesforce?
we need to insert the new file record into Salesforce. But if we insert the new record we can lose Created Date, LastModified Date, CreatedById, and Last Modified By Id.
Related Topics | You May Also Like
 How to display upload Image if a record existing an attachment in lightning component? | how to display image icon in lightning component from attachment
 How to create a form and submit on database in lightning component? | how to building a form with multiple lightning input field in aura components and submit through apex class in Salesforce
 How to validate child component from parent component on click button using aura method in lightning component | how to validate child component from parent component in lightning component Salesforce
 How to create custom lookup on custom object in lightning component | how to create custom lookup dynamically as re-usable in Salesforce lightning component
 Get Picklist Values Dynamically and display Picklist values & Radio Buttons value in Lightning Component Salesforce | how to get radio button and picklist value in lightning component
 how to get specific value of custom label in apex class method in Lightning Component Salesforce | how to access dynamic custom label in lightning component through apex class in Salesforce
 How to Fetch/Edit Custom Metadata Type Records Uses of lightning:datatable and onrowaction operation in Lightning Component Salesforce | how to custom metadata retrieve/edit through apex in aura lighting component Salesforce
 How to wrapper class retrieve all the values in Salesforce Lightning Component | how to pass wrapper class instance to fetch record from custom object in Salesforce lightning component
Note:: – You will get an email, so put correct email and mobile number and BEGIN YOUR JOURNEY from Today!

Our Free Courses →
|
👉 Get Free Course →

📌 Salesforce Administrators 📌 Salesforce Lightning Flow Builder 📌 Salesforce Record Trigger Flow Builder |
👉 Get Free Course →

📌 Aura Lightning Framework 📌 Lightning Web Component (LWC) 📌 Rest APIs Integration |

Vijay Kumar
Hi, This is Vijay Kumar behind the admin and founder of w3web.net. I am a senior software developer and working in MNC company from more than 8 years. I am great fan of technology, configuration, customization & development. Apart of this, I love to write about Blogging in spare time, Working on Mobile & Web application development, Salesforce lightning, Salesforce LWC and Salesforce Integration development in full time. [Read full bio] | | The Sitemap where you can find all published post on w3web.net