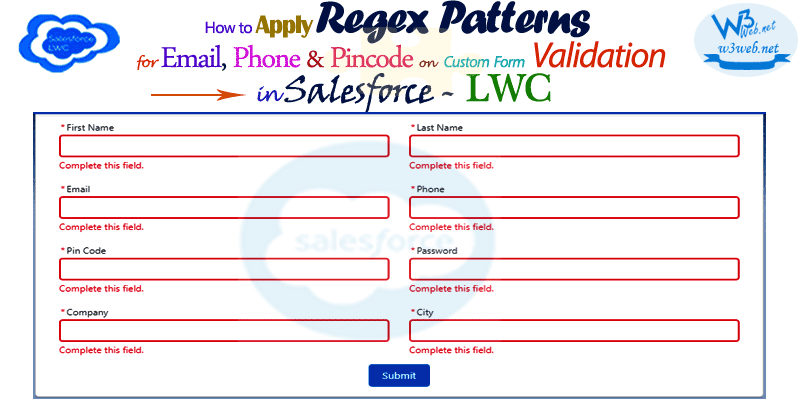
Hey guys, today in this post we are going to learn about How to apply regex patterns for Email, Phone & Pincode on custom form validation and clear input field on button click in Salesforce LWC.
- Don’t forget to check out:- Create dynamically form validation for required field in lwc. Click Here For More Information
Files we used to create custom form validation in LWC
| lwcRegexFormValidation.html | LWc HTML File | Template HTML file for used to create custom form validation with regex pattern in Salesforce LWC |
| lwcRegexFormValidation.js | LWC JavaScript File | It is holding action function that fire on click button and diaplay required error message. |
| lwcRegexFormValidation.js-meta.xml | XML Meta File | It is used to where this lightning web component file you want to display as like lightning__AppPage, lightning__RecordPage, lightning__HomePage. |
Final Output

You can download file directly from github by Click Here.
Other related post that would you like to learn in Salesforce
- Find the below steps
⇒ Create Lightning Web Component HTML
Step 1:- Create Lightning Web Component HTML ➡ lwcRegexFormValidation.html
SFDX:Lightning Web Component ➡ New ➡ lwcRegexFormValidation.html
lwcRegexFormValidation.html [Lightning Web Component HTML]
<template><lightning-card><div class="slds-p-around_medium"><h3 class="slds-text-heading_medium"><lightning-icon icon-name="custom:custom85" size="small"></lightning-icon> <strong style="color:#270086; font-size:13px;"> Crearte Registration Form in Lightning Web Component (LWC) </strong></h3>
<br/><br/><div class="slds-grid slds-wrap"><div class="slds-col slds-size_6-of-12 slds-p-horizontal--small slds-m-bottom--small"><lightning-input name="firstName" class="reqInpFld" type="text" label="First Name" required></lightning-input></div><div class="slds-col slds-size_6-of-12 slds-p-horizontal--small slds-m-bottom--small"><lightning-input name="lastName" class="reqInpFld" type="text" label="Last Name" required></lightning-input></div><div class="slds-col slds-size_6-of-12 slds-p-horizontal--small slds-m-bottom--small"><lightning-input name="email" class="reqInpFld" type="email" label="Email" pattern="[A-Za-z0-9._-]+@[a-z0-9-]+.[a-z]{2,}$" message-when-pattern-mismatch="Please enter a valid email" required></lightning-input></div><div class="slds-col slds-size_6-of-12 slds-p-horizontal--small slds-m-bottom--small"><lightning-input name="phone" class="reqInpFld" type="tel" label="Phone" pattern="[0-9]{3}-[0-9]{3}-[0-9]{4}$" message-when-pattern-mismatch="Please enter a valid phone number" required></lightning-input></div><div class="slds-col slds-size_6-of-12 slds-p-horizontal--small slds-m-bottom--small"><lightning-input name="pincode" class="reqInpFld" type="number" label="Pin Code" min="1000" max="999999" message-when-range-overflow="Please enter a correct pincode" message-when-range-underflow="Please enter a correct pincode" required></lightning-input></div><div class="slds-col slds-size_6-of-12 slds-p-horizontal--small slds-m-bottom--small"><lightning-input name="password" class="reqInpFld" type="password" label="Password" required></lightning-input></div><div class="slds-col slds-size_6-of-12 slds-p-horizontal--small slds-m-bottom--small"><lightning-input name="company" class="reqInpFld" type="text" label="Company" required></lightning-input></div><div class="slds-col slds-size_6-of-12 slds-p-horizontal--small slds-m-bottom--small"><lightning-input name="City" class="reqInpFld" type="text" label="City" required></lightning-input></div></div><div class="slds-grid slds-wrap"><div class="slds-col slds-size_12-of-12 slds-text-align--center"><lightning-button variant="brand" label="Submit" onclick={submitRegAction}></lightning-button></div></div><br/><br/><!--Start RelatedTopics Section--><div style="border:1px #ddd solid; padding:10px; background:#eee; margin:40px 0;"><p data-aura-rendered-by="435:0"><img src="https://www.w3web.net/wp-content/uploads/2021/05/thumbsUpLike.png" width="25" height="25" style="vertical-align:top; margin-right:10px;" data-aura-rendered-by="436:0"><strong data-aura-rendered-by="437:0"><span style="font-size:16px; font-style:italic; display:inline-block; margin-right:5px;">Don't forget to check out:-</span><a href="https://www.w3web.net/" target="_blank" rel="noopener noreferrer" style="text-decoration:none;" data-aura-rendered-by="440:0">An easy way to learn step-by-step online free Salesforce tutorial, To know more Click <span style="color:#ff8000; font-size:18px;" data-aura-rendered-by="442:0">Here..</span></a></strong></p>
<br/><br/><p data-aura-rendered-by="435:0"><img src="https://www.w3web.net/wp-content/uploads/2021/07/tickMarkIcon.png" width="25" height="25" style="vertical-align:top; margin-right:10px;" data-aura-rendered-by="436:0"><strong data-aura-rendered-by="437:0"><span style="font-size:17px; font-style:italic; display:inline-block; margin-right:5px; color:rgb(255 128 0);">You May Also Like →</span> </strong></p>
<div style="display:block; overflow:hidden;"><div style="width: 50%; float:left; display:inline-block"><ul style="list-style-type: square; font-size: 16px; margin: 0 0 0 54px; padding: 0;"><li><a href="https://www.w3web.net/lwc-get-set-lightning-checkbox-value/" target="_blank" rel="noopener noreferrer">How to get selected checkbox value in lwc</a></li>
<li><a href="https://www.w3web.net/display-account-related-contacts-in-lwc/" target="_blank" rel="noopener noreferrer">how to display account related contacts based on AccountId in lwc</a></li>
<li><a href="https://www.w3web.net/create-lightning-datatable-row-actions-in-lwc/" target="_blank" rel="noopener noreferrer">how to create lightning datatable row actions in lwc</a></li>
<li><a href="https://www.w3web.net/if-and-else-condition-in-lwc/" target="_blank" rel="noopener noreferrer">how to use if and else condition in lwc</a></li>
<li><a href="https://www.w3web.net/get-selected-radio-button-value-and-checked-default-in-lwc/" target="_blank" rel="noopener noreferrer">how to display selected radio button value in lwc</a></li>
</ul></div><div style="width: 50%; float:left; display:inline-block"><ul style="list-style-type: square; font-size: 16px; margin: 0 0 0 54px; padding: 0;"><li><a href="https://www.w3web.net/display-account-related-contacts-lwc/" target="_blank" rel="noopener noreferrer">display account related contacts based on account name in lwc</a></li>
<li><a href="https://www.w3web.net/create-lightning-datatable-row-actions-in-lwc/" target="_blank" rel="noopener noreferrer">how to insert a record of account Using apex class in LWC</a></li>
<li><a href="https://www.w3web.net/fetch-picklist-values-dynamic-in-lwc/" target="_blank" rel="noopener noreferrer">how to get picklist values dynamically in lwc</a></li>
<li><a href="https://www.w3web.net/edit-save-and-remove-rows-dynamically-in-lightning-component/" target="_blank" rel="noopener noreferrer">how to edit/save row dynamically in lightning component</a></li>
<li><a href="https://www.w3web.net/update-parent-object-from-child/" target="_blank" rel="noopener noreferrer">update parent field from child using apex trigger</a></li>
</ul></div><div style="clear:both;"></div><br/><div class="youtubeIcon"><a href="https://www.youtube.com/channel/UCW62gTen2zniILj9xE6LmOg" target="_blank" rel="noopener noreferrer"><img src="https://www.w3web.net/wp-content/uploads/2021/11/youtubeIcon.png" width="25" height="25" style="vertical-align:top; margin-right:10px;"/> <strong>TechW3web:-</strong> To know more, Use this <span style="color: #ff8000; font-weight: bold;">Link</span> </a>
</div></div></div><!--End RelatedTopics Section--></div></lightning-card></template>
⇒ Create Lightning Web Component Javascript
Step 2:- Create Lightning Web Component Javascript ➡ lwcRegexFormValidation.js
SFDX:Lightning Web Component ➡ New ➡ lwcRegexFormValidation.js
lwcRegexFormValidation.js [LWC JavaScript File]
import { LightningElement } from 'lwc';
import { ShowToastEvent } from 'lightning/platformShowToastEvent';
export default class LwcRegexFormValidation extends LightningElement {
regContactForm = {};
regInpFormAction() {
var isValidVal = true;
var inputFields = this.template.querySelectorAll('.reqInpFld');
inputFields.forEach(inputField => {
if(!inputField.checkValidity()) {
inputField.reportValidity();
isValidVal = false;
}this.regContactForm[inputField.name] = inputField.value;
});
return isValidVal;
}submitRegAction() {
if(this.regInpFormAction()) {
console.log(this.regContactForm);
var inputFields = this.template.querySelectorAll('.reqInpFld');
inputFields.forEach(inputField => {
inputField.value="";
});
const toastEvent = new ShowToastEvent({
title:'Success!',
message:'Record created successfully',
variant:'success'
});
this.dispatchEvent(toastEvent);
}}}
⇒ Create Lightning Web Component Meta XML
Step 3:- Create Lightning Web Component Meta XML ➡ lwcRegexFormValidation.js-meta.xml
SFDX:Lightning Web Component ➡ New >> lwcRegexFormValidation.js-meta.xml
lwcRegexFormValidation.js-meta.xml [LWC Meta Data XML]
<?xml version="1.0" encoding="UTF-8"?><LightningComponentBundle xmlns="http://soap.sforce.com/2006/04/metadata"><apiVersion>45.0</apiVersion>
<isExposed>true</isExposed>
<targets><target>lightning__AppPage</target>
<target>lightning__RecordPage</target>
<target>lightning__HomePage</target>
</targets></LightningComponentBundle>

Further post that would you like to learn in Salesforce
What is form validation with example?
Form validation normally used to occur at the server, after the client had entered all the necessary data and then pressed the Submit button.
Why JavaScript is used for validation?
Validation is a method to authenticate the user. JavaScript provides the facility to validate the form on the client-side so data processing will be faster than server-side validation.
What is a validation document?
Validation is the documented process of demonstrating that a system or process meets a defined set of requirements.
Related Topics | You May Also Like
Note:: – You will get an email, so put correct email and mobile number and BEGIN YOUR JOURNEY from Today!

Our Free Courses →
|
👉 Get Free Course →

📌 Salesforce Administrators 📌 Salesforce Lightning Flow Builder 📌 Salesforce Record Trigger Flow Builder |
👉 Get Free Course →

📌 Aura Lightning Framework 📌 Lightning Web Component (LWC) 📌 Rest APIs Integration |


